Showing posts with label healthy. Show all posts

Thursday, June 26, 2014

Nutella, Banana, and Peanut Butter Smoothie

I was a sick child. My favorite lunch to have before going to afternoon kindergarten (and while watching "The Elephant Show," of course) was potato chips dipped in peanut butter. Don't ask.

To this day, my love for peanut butter (and potato chips) hasn't waned...I just choose to eat them separately now. With that being said, though, I could pretty much eat peanut butter with anything else - although bananas and/or Nutella tend to be great peanut butter companions.

And now that summer's [finally!] here in Boston - which means, it's hot and humid here in Boston - I'm always looking for cool and satisfying snacks and meals to eat. And why not make a cool and satisfying snack that's filled with three of my favorite things?

Nutella, Banana, and Peanut Butter Smoothie | The Economical Eater

Nutella, Banana, and Peanut Butter Smoothie
Yields: 1 serving
-1 ripe banana, peeled
-1 heaping tablespoon peanut butter (crunchy or creamy)
-1/2 tablespoon Nutella
-1/2 cup unsweetened vanilla almond milk
-2-3 ice cubes

Directions:
1.) Place all ingredients in a blender and blend until smooth. Seriously...that's it.


Nutella, Banana, and Peanut Butter Smoothie | The Economical Eater

Cold, creamy, sweet, and nutty, this smoothie was super tasty, and satiating to boot. The protein from the peanut butter helped pack some staying power, while the nutty and sweet flavors from the Nutella and vanilla almond milk made every sip extra delicious. And the banana? Besides providing some nutrients to the mix, it also made the texture wonderfully thick and creamy.

If you're looking to keep things vegan, swap out the Nutella for cocoa powder.

For the Nutella lovers, I suggest washing down this mostly healthy smoothie with something not quite as healthy - like my Nutella Cream Cheese Chocolate Chunk Brownies or Nutella and Banana Turnovers with Sea Salt.

Do you love peanut butter [and/or Nutella] as much as I do? 


Monday, June 23, 2014

Grilled Maple Brussels Sprouts Slaw

I usually despise coleslaw. Typically, it's nothing but an under-seasoned side dish consisting of cabbage drenched in mayonnaise.

But I know coleslaw can be good, when it's prepared well. And I also know coleslaw doesn't have to consist of cabbage and mayonnaise at all. It can also be made with other crunchy vegetables, like Brussels sprouts - cabbage's smaller, tastier friend.

Grilled Maple Brussels Sprouts | The Economical Eater

We had a bunch of leftover grilled Brussels sprouts last week that I decided to turn into this vegan-friendly, healthier coleslaw. To grill the sprouts, we simply dressed them in some olive oil and seasoned them with salt and pepper, then put them right on the grill. We cooked them until they were browned on both sides - then, as soon as they came off the grill, I drizzled them with some good maple syrup. (You can easily use this same method by roasting the sprouts, if you don't have a grill). The end result were smoky and sweet sprouts that were delicious as a side on their own...but they tasted even better the next day in this slaw.

Grilled Maple Brussels Sprouts Slaw | The Economical Eater

Grilled Maple Brussels Sprouts Slaw
Yields: 2-3 servings
-1 teaspoon Dijon mustard
-1 teaspoon maple syrup
-Squirt of lemon juice
-1/2 teaspoon olive oil
-Salt and black pepper, to taste
-1 cup shredded Brussels sprouts
-1 heaping tablespoon dried cranberries
-1 teaspoon sunflower seeds

Directions:
1.) In a small bowl, whisk together mustard, maple syrup, and lemon juice. Continue whisking while you slowly pour in the olive oil. Season with salt and pepper.
2.) Place Brussels sprouts, cranberries, and sunflower seeds in a medium bowl. Pour in dressing, and toss to coat. Serve immediately, or, better yet, let slaw sit in the fridge for 15-20 minutes before serving.

[Print this recipe]

Grilled Maple Brussels Sprouts Slaw | The Economical Eater

This slaw would make a great side dish for a barbecue, especially if you have some vegans in attendance. I loved how the Brussels sprouts maintained their crunch, while the chewy cranberries and the crunchy sunflower seeds provided some additional textures and flavors. The dressing was also delightfully light and flavorful, and didn't drown the rest of the ingredients. (Sorry, mayonnaise).

What's your favorite side dish at a barbecue? 


Thursday, June 12, 2014

Chickpea, Mint, and Feta Burgers with Yogurt-Dill Sauce

Just checking in with a quick, tasty new burger recipe before Z and I jet off to Portland, Oregon for a few days!

The burgers and the yogurt-dill sauce in this recipe both use herbs we're growing right in our backyard. (Well, I accidentally planted "dill bouquet," but it still works). In addition to the dill, the burgers possess fresh, fragrant mint that helps complement the aromatic spices and the creamy feta. These burgers were quite a hit with Z, and I know they'll be a hit with your family, too!

Chickpea, Mint, and Feta Burgers with Yogurt-Dill Sauce | The Economical Eater

Chickpea, Mint, and Feta Burgers with Yogurt-Dill Sauce
Yields: 4 burgers
Burgers:
-1 15-ounce can chickpeas, drained and rinsed
-1/2 small yellow onion, minced
-1/4 cup loosely packed fresh mint leaves
-1 clove garlic, minced
-1 teaspoon ground cumin
-1/2 teaspoon paprika
-Salt and black pepper, to taste
-1/8 cup yellow corn meal (or plain bread crumbs)
-3 tablespoons olive oil, divided
-1/4 cup crumbled feta
-4 burger buns
-Sliced cucumber (optional)

Yogurt-Dill Sauce:
-1 5.3-ounce container plain Greek yogurt (I used Chobani)
-1 tablespoon chopped fresh dill
-Squirt of lemon juice
-Salt and black pepper, to taste

Directions:
Burgers:
1.) Place the chickpeas, onion, mint, and garlic in a food processor that's fitted with a steel blade. Pulse until combined and texture is mostly smooth, but still slightly chunky. (If you don't have a food processor, just mash the chickpeas with a fork and just be sure the mint is chopped).
2.) Spoon the chickpea mixture into a medium bowl and add spices, corn meal, and 1 tablespoon olive oil. Stir until combined, then taste for seasoning and adjust as necessary. Add feta and carefully stir to combine.
3.) Heat remaining 2 tablespoons olive oil over medium heat. As oil is warming up, form the chickpea mixture into four equal-sized patties. Place patties in the pan and cook for about 5 minutes, or until golden brown. Carefully flip burgers and cook on the opposite side until golden brown, about 3-4 minutes. 
4.) Serve with generous slathers of yogurt-dill sauce and sliced cucumber.

Yogurt-Dill Sauce:
1.) In a small bowl, combine ingredients. Let chill in fridge for 30 minutes before serving.


I loved how the cooling mint and the creamy yogurt-dill sauce complemented the smoky cumin and paprika. These burgers really tasted like summer, and I loved how some of the ingredients came right from our own backyard!

If you have several cans of chickpeas on-hand, I also recommend trying my Chickpea Burgers with Vegan Cilantro Mayonnaise.

Have you ever been to Portland, Oregon before? Any suggestions for where we should go?


Tuesday, June 10, 2014

Almost Summer Corn Soup

One of my favorite things to do as a kid (in the summer) was sit on the back deck with my siblings and shuck fresh ears of corn. Having fresh corn was always a treat, and we usually ate cobs slathered in butter alongside fresh lobster (also slathered in butter) or burgers and dogs on the grill. Those are some of my favorite childhood memories, and every time I shuck a fresh ear of corn today, I'm brought back to those blissful summer days.

We ended up with a ton of leftover corn from the Union Square Farmers' Market several weekends ago, and I dreaded it going to waste. In an effort to make use of it all, I threw together this corn soup - complete with a homemade, silky corn stock.

Almost Summer Corn Soup | The Economical Eater

This soup definitely had me reminiscing about my childhood days in the backyard. It also had me that much more excited for the summer ahead.

Head on over to Local in Season for the recipe!

We also have a winner of my BBQ sauce giveaway! The winner was chosen using Random.org.

And the winner is...

Theresa!

"I'm also gonna go with sweet chipotle bourbon, woot woot!"

Congrats, Theresa! Please email me within 48 hours to claim your prize.


Thursday, May 29, 2014

Vegan Spring Chili

In the wintertime, Z and I make my Slow Cooker Vegetarian Chili almost weekly. The hearty, protein-packed chili is so wonderfully comforting on a cold winter evening. 

Last week, when the temperatures were in the 70s (come back, please?), I was craving my chili. We didn't have all of the ingredients I needed on-hand, so I winged it...and came up with a spring-friendly version of our winter favorite.

Vegan Spring Chili | The Economical Eater

Vegan Spring Chili
Yields: 4-5 servings
-1 tablespoon olive oil
-1/2 red onion, diced
-1 large clove garlic, minced
-3/4 cup chopped roasted red peppers
-1 tablespoon chili powder
-1 teaspoon ground cumin
-Generous pinch of cinnamon
-Pinch of cayenne
-Salt and black pepper, to taste
-3 cups low-sodium vegetable broth
-1 15-ounce can low-sodium black beans (not drained)
-1 15-ounce can chickpeas, drained and rinsed
-1 cup frozen sweet corn kernels
-1 tablespoon chopped pickled jalapenos
Fresh cilantro and lime wedges, for serving

Directions:
1.) In a medium-large pot, heat olive oil over medium heat. Add onion and cook until it begins to soften, about 5-6 minutes. Add garlic and cook until fragrant, about 15 seconds. Add roasted red peppers, chili powder, cumin, cinnamon, cayenne, salt, and pepper, and cook for about 1 more minute.
2.) Pour in vegetable broth, black beans, chickpeas, corn, and jalapenos. Turn heat to high and bring to a boil. Then, lower heat and simmer for 20 minutes. Taste for seasoning. 
3.) Serve with fresh cilantro and lime wedges. (We also enjoyed some Goat Cheese & Scallion Scones on the side).


Vegan Spring Chili | The Economical Eater

This spring version of my favorite chili was satiating yet perfectly light for a warmer evening. I loved how the hint of cinnamon helped sweeten things up while the cayenne, jalapenos, and chili powder gave each spoonful a nice mellow kick of heat.

Several nights later, we spooned some of the leftovers on top of nachos, and I highly recommend you do that, too. ;)

What's your favorite soup or chili to have in the spring?


Wednesday, May 21, 2014

Radish and Fava Bean Salad

I'm always looking for new salad ideas. During the colder months, we usually stick to baby arugula or baby kale salads (typically as a side dish at dinner), but as soon as the weather warms up - and all of this fresh produce is available - I crave something more. Something more creative.

Next week, I'm catering a dinner party and the host asked if I could make a salad from Ottolenghi: The Cookbook (we're both big fans). I happily obliged, and offered to make this Radish and Fava Bean Salad (with a few tiny modifications). To make sure the salad was what I wanted, I made a batch yesterday...and let me tell you, this is spring in a bowl.

Radish and Fava Bean Salad | The Economical Eater

Almost like a salsa, this hearty and chunky salad is chock-full of protein-packed fava beans, crunchy radishes, spicy red onions, and a ton of fresh parsley and cilantro. It's a great, cool salad for warmer days, and made a lovely accompaniment to veggie burgers we cooked on the grill (old habits die hard, I guess!).

Radish and Fava Bean Salad with Green Tahini Sauce
Yields: 4 servings
Adapted slightly from Ottolenghi
Salad:
-1 pound fresh shelled fava beans
-1 1/2 cups small radishes
-1/2 red onion, very thinly sliced
-2 tablespoons finely chopped cilantro
-1/8 teaspoon lemon zest
-Juice of 2 lemons
-2 tablespoons chopped flat-leaf parsley
-3 tablespoons olive oil
-1 teaspoon ground cumin
-Salt and black pepper, to taste
-Scant 1 cup Green Tahini Sauce (recipe follows)

Sauce:
Yields: About 1 1/2 cups
-2/3 cup tahini paste
-2/3 cup water
-5 tablespoons lemon juice
-2 cloves garlic, crushed
-1/2 teaspoon salt
-1/2 cup flat-leaf parsley leaves

Directions:
Salad:
1.) Place the fava beans in a pot of boiling water and simmer for 1 to 2 minutes, depending on size. Drain through a large colander and rinse under cold water to refresh them. Remove the beans from their skins by gently squeezing each one with your fingertips.
2.) Cut the radishes into 4 wedges each and mix with the fava beans, onion, cilantro, lemon zest, lemon juice, parsley, olive oil, and cumin. Season with salt and pepper to taste.
3.) To serve, mix with the Green Tahini Sauce, being careful not to overdress the salad (you may not need the entire 1 cup). Ottolenghi suggests serving the two separately, but I enjoyed it tossed together.

Sauce:
1.) In a food processor fitted with a steel blade, combine everything except for the parsley until smooth. Add more water if needed (you want a creamy and smooth consistency, almost like honey). Add the parsley and turn the machine on again for a second or two. 


Radish and Fava Bean Salad | The Economical Eater

I loved all of the fresh lemon juice and herbs in this salad. I also loved how the surprisingly light, nutty tahini sauce paired with the rest of the bright, fresh flavors. This salad is definitely one I can see us making several times this summer (especially for our vegan peeps!).

What's your favorite spring/summer salad?


Wednesday, April 30, 2014

Veggie-Packed Quinoa Salad

Remember that time we thought spring had finally arrived? Yeah...it's currently going on day 1,000 of being 40ish degrees here in Boston, topped off with some nice rain. Thanks, Mother Nature.

Thankfully, Z and I had this springy and vibrant quinoa salad last week to help us get over our spring blues. It was basically a "let's clean out the fridge" salad, but it worked. Chock-full of grilled asparagus, roasted red peppers, caramelized onions, and feta cheese, this was one satisfying yet healthy "spring" dinner.

Veggie-Packed Quinoa Salad | The Economical Eater

Veggie-Packed Quinoa Salad
Yields: 2 servings
-1/2 cup uncooked quinoa
-1 cup water
-1 tablespoon olive oil
-1/4 yellow onion, sliced
-Pinch of granulated sugar
-1/2 cup chopped roasted red peppers (from a jar)
-1 cup chopped cooked asparagus (we used leftover grilled asparagus)
-1 tablespoon fresh lemon juice
-Pinch of crushed red pepper flakes
-Salt and black pepper, to taste
-1/4 cup crumbled feta 

Directions:
1.) Place quinoa and water in a large saucepan and bring to a boil. Reduce heat and simmer, covered, for about 15 minutes, or until all the water is absorbed. Uncover and fluff with a fork.
2.) While quinoa is cooking, heat olive oil in a skillet over medium-low heat. Add onions and cook for about two minutes; sprinkle with sugar and continue cooking until onions are softened and begin to brown/caramelize, about 10 minutes.
3.) Mix onions, red peppers, and asparagus with quinoa. Pour over lemon juice and season with crushed red pepper flakes, salt, and black pepper. Transfer to a serving bowl.
4.) Add crumbled feta, stir, and enjoy!


Veggie-Packed Quinoa Salad | The Economical Eater

The best part about this salad is that it's satiating - I'm not one to have a salad for dinner, but quinoa is packed with protein, which makes this "salad" fit for a meal.

This dinner also made us believe it was, in fact, spring. Even if just for 10 minutes. 

Don't forget: You have one day left to enter my giveaway for a $25 gift card to b.good + a mixed four-pack of Sir Kensington's all-natural condiments!


Wednesday, April 23, 2014

Spring Pasta with Peas, Mushrooms, and Parsley-Arugula Pesto

Ah, spring. The season that brings long-awaited warmer temperatures and happier moods to my corner of the [New England] world. But my absolute favorite part about spring: the fresh, local produce that starts popping up everywhere. 

Ramps, fiddleheads, arugula, fresh herbs - so many green, delicious things sprout up in the spring. And while we're still impatiently waiting for many of these things to be available to us, I tried willing spring's harvest with this super green, super tasty pasta dish. (You're welcome).

Spring Pasta with Peas, Mushrooms, and Parsley-Arugula Pesto | The Economical Eater

Chock-full of sweet peas, meaty mushrooms, and a bright, slightly peppery pesto, this spring-friendly pasta dish was a nice [albeit somewhat cruel] tease for what's to come. 

Spring Pasta with Peas, Mushrooms, and Parsley-Arugula Pesto
Yields: 4 servings
Pasta:
-2 tablespoons olive oil
-2 cups white button mushrooms, stems removed and sliced
-1 clove garlic, minced
-Pinch of crushed red pepper flakes
-Splash of dry white wine (I used pinot grigio)
-Salt and black pepper, to taste
-3 cups whole wheat penne (or whichever pasta you wish)
-1 cup frozen peas
-3 spoonfuls Parsley-Arugula Pesto (recipe follows)
-Freshly grated Parmesan cheese, for serving

Directions:
1.) Heat olive oil in a medium skillet over medium heat. Add mushrooms, and cook until they begin to brown, about 4-5 minutes. Add garlic and crushed red pepper flakes, and cook until garlic becomes fragrant, about 15 seconds. Add wine, salt, and black pepper, and cook for one minute more.
2.) Bring a pot of salted water to a boil. Add pasta, and cook until it begins to become al dente, about 6-7 minutes (time will vary depending on type of pasta used). With one minute of cooking time left, add peas. Drain pasta and peas together in a strainer.
3.) Return pasta and peas to the pot, and stir in mushroom mixture. Add pesto, and stir until pesto is incorporated. Serve with a generous garnish of Parmesan cheese.

Parsley-Arugula Pesto:*
-2 (loosely packed) cups fresh parsley
-2 (tighly packed) cups arugula
-1 clove garlic, peeled
-1/4 cup walnuts
-1/2 cup grated Parmesan cheese
-Juice of half a lemon
-Pinch of crushed red pepper flakes
-2/3 cup olive oil
-Salt and black pepper, to taste

Directions:
1.) Add above ingredients, through crushed red pepper flakes, to a food processor fitted with a steel blade. Turn on food processor, and stream in olive oil while food processor is running.
2.) Taste pesto and add salt and black pepper as needed.

*One quick note: I made this pesto to make use of leftover parsley and arugula, so I kind of winged the amount of greens used. Just taste and adjust as needed after all of the ingredients are incorporated. 


Spring Pasta with Peas, Mushrooms, and Parsley-Arugula Pesto | The Economical Eater

This dish was surprisingly light yet full of nutritious, satiating ingredients. (Yes, Parmesan cheese is nutritious...in my opinion, anyway). We actually ate heaping bowls of this by itself, although you could serve it alongside a simple green salad and/or some garlic bread, if you so choose.

What vegetable and/or fruit are you most looking forward to this spring?


Thursday, January 16, 2014

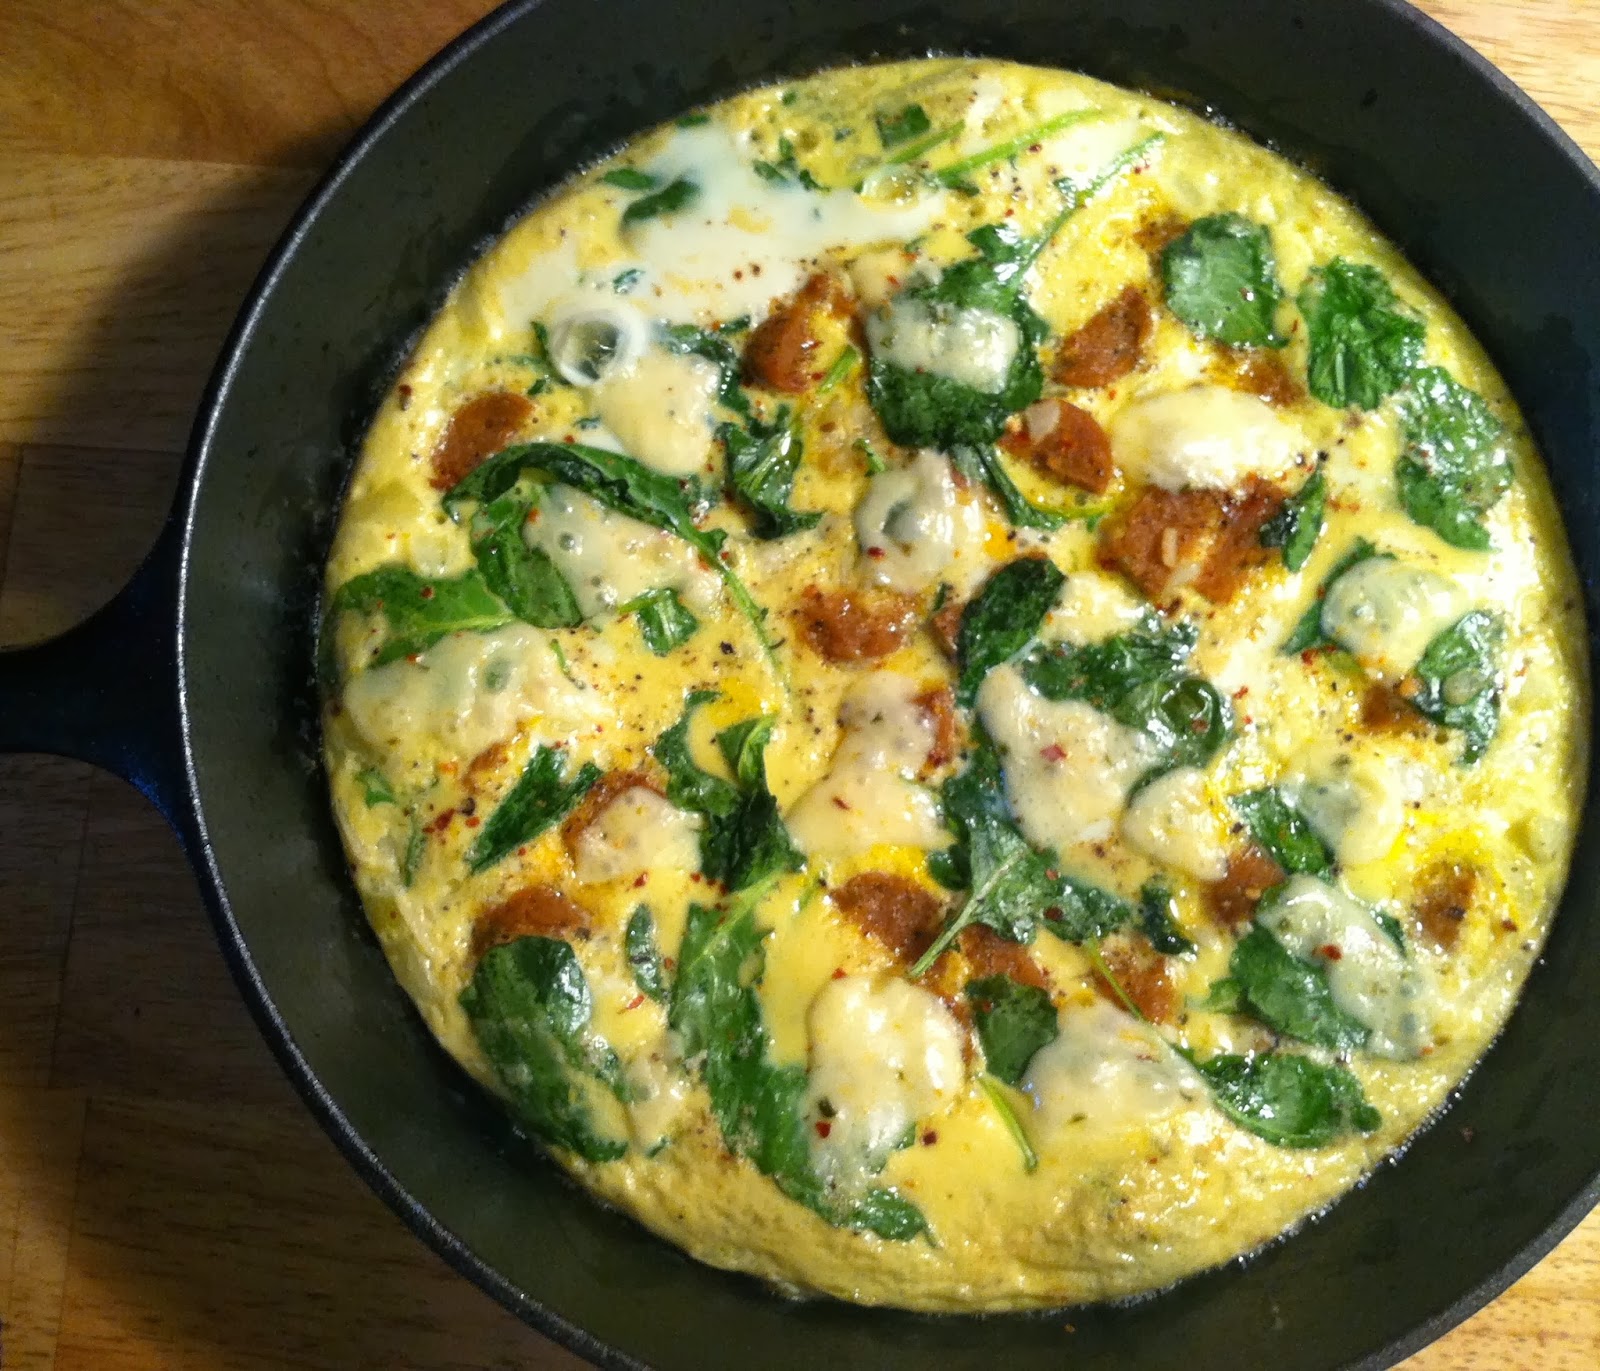
Kale, Onion, and Sausage Frittata

For Christmas, my parents gave me and Z a cast-iron pan. To say I was excited would be an understatement - I've been wanting one for quite some time now.

When we opened this gift, I knew the first thing I wanted to make in it: a frittata. And that's exactly what I did last weekend.

For this frittata, I used a combination of eggs and egg whites - Z is trying to cut back on his cholesterol intake, so we always have egg whites in the fridge. However, feel free to use just eggs for this recipe.

Frittatas are also a great way to use up leftover veggies and meats/veg-friendly "meats," so feel free to change this recipe up as you see fit. 

Kale, Onion, and Sausage Frittata | The Economical Eater

Kale, Onion, and Sausage Frittata
Yields: 3-4 servings
Adapted from Food Network
-8 large eggs (I used a combination of eggs and egg whites - about 50/50)
-2 tablespoons whole milk 
-Salt and pepper
-1 tablespoon butter
-1/2 yellow onion, diced
-1 to 1 1/2 cups baby kale 
-1 vegetarian Italian sausage, chopped
-Pinch of crushed red pepper flakes
-Pepper jack cheese (optional)

Directions:
1.) Preheat oven to 400 degrees F.
2.) In a large bowl, whisk together eggs, milk, salt, and pepper.
3.) Melt butter in a cast-iron pan over medium heat. Add the onion and cook until it begins it brown, about 5-7 minutes. Add kale, sausage, and crushed red pepper flakes and cook for an additional minute. Pour the eggs over the mixture.
4.) Pull the edges away from the sides of the pan with a spatula so the eggs flow to the bottom of the pan. When the frittata is half set, transfer the pan to the heated oven. 
5.) Bake for 7 minutes. Remove from oven, sprinkle with cheese, and put the pan back in the oven for an additional 3-4 minutes, until cheese is melted and frittata is puffed and golden.


Paired with some toast and hot sauce, this was one incredible (and filling!) brunch.

What else should I make in my cast-iron pan?


Thursday, January 9, 2014

Indian-Spiced Chickpea & Vegetable Stew

Turmeric, cumin, garam masala, and coriander are my favorite spices to cook (and bake) with. I just love the intense flavors these spices give certain dishes, especially when used together.

The secret to this soup - and, well, to most recipes using spices - is to first infuse the spices in the oil before you begin cooking everything else. Simply heating the spices for a quick 10 seconds infuses the finished product with smooth, incredible flavor (vs. the almost chalky taste spices can give a dish when added later on).

This was Z and I's favorite soup creation so far this year. So, grab a spoon and dig in!

Indian-Spiced Chickpea & Vegetable Stew | The Economical Eater

*One note: Per usual, I didn't measure the spices - I eyeballed about 1 tablespoon cumin, 1 teaspoon turmeric, 1/2 teaspoon garam masala, and 1 teaspoon ground coriander. Additional pinches of spices can be added later, if needed. 

Indian-Spiced Chickpea & Vegetable Stew
Yields: 4 servings
-2 tablespoons olive oil
-Cumin
-Turmeric
-Garam masala
-Ground coriander
-Pinch of cayenne
-1/2 yellow onion, diced
-3 medium carrots (or 4 small carrots), chopped
-1 clove garlic, minced
-1 15 ounce can chickpeas, drained and rinsed
-1 15 ounce can diced tomatoes (preferably fire-roasted)
-2 cups low-sodium vegetable broth
-1 bay leaf
-Salt and black pepper, to taste

Directions:
1.) In a large saucepan, heat olive oil over medium to low heat. Add spices, stir, and cook only until fragrant (about 10 seconds). Add onions and carrots, and cook until softened (about 8-10 minutes).
2.) Add garlic and stir; cook just until fragrant, about 10 seconds. Add chickpeas, tomatoes, vegetable broth, bay leaf, salt, and pepper; bring to a boil.
3.) Lower heat to simmer and cook, stirring occasionally, for at least 20 minutes (can simmer longer if necessary). Taste and adjust seasonings as necessary before serving.

[Print this recipe]

Indian-Spiced Chickpea & Vegetable Stew | The Economical Eater

This recipe is similar to the Spicy Chickpea and Vegetable Soup I made recently, but is packed with a whole bunch of different flavors. I loved the subtle heat from the cayenne mixed with the almost exotic flavors of the garam masala and turmeric. It doesn't hurt that this soup is super healthy, either (turmeric is one healthy spice!).

Indian-Spiced Chickpea & Vegetable Stew | The Economical Eater

The hearty texture from the carrots, tomatoes, and chickpeas also makes this one filling soup. Serve alongside some fresh bread for an extra boost of comfort.

What's your favorite soup or stew recipe to make when it's this freakin' cold outside?


Tuesday, December 3, 2013

Moroccan-Spiced Lentil & Veggie Stew

I hope you all had a great Thanksgiving! Our's was super relaxing, and we followed up a four-day stint on the Cape with a short brewery crawl in Vermont (our first stop was documented here). It was a lot of fun, but I was happy to be home Sunday night.

And what better way to welcome ourselves back home than with a big pot of healthy soup? I was in the mood for something warm and nutritious - but also full of flavor - and that's how this soup was born. Full of warming spices, hearty lentils, and nutritious vegetables, I am beyond thankful that we have so much leftover. This soup will also freeze well, so our leftovers should last us all winter long.


Moroccan-Spiced Lentil & Veggie Stew
Yields: 8-10 servings
-2 tablespoons olive oil
-1/2 large yellow onion, diced
-4 medium carrots, chopped
-1 clove garlic, minced
-Cinnamon (about 1 teaspoon)
-Turmeric (about 1 1/2 teaspoons)
-Cumin (about 1 tablespoon)
-Ground coriander (about 1 1/2 teaspoons)
-Pinch of cayenne pepper
-Salt and pepper
-1 box (32 ounces) low-sodium vegetable broth
-1 1/2 cups water*
-5 white button mushrooms, sliced
-1 3/4 cups lentils
-1 15-ounce can diced tomatoes
-2 cups frozen spinach, thawed
-1 cup frozen peas, thawed

Directions:
1.) Heat oil in a large sauce pot over medium heat; add onions and carrots and cook, stirring occasionally, until softened, about 10 minutes. 
2.) Stir in garlic and cook for 30 seconds. Add spices, and cook, stirring until fragrant, about 1 minute.
3.) Add broth, water, mushrooms, lentils, and tomatoes; bring to a boil. Reduce heat and simmer, partially covered, stirring occasionally for about 35-40 minutes. 
4.) Stir in spinach and peas and cook for an additional 10 minutes, or until spinach and peas are cooked and lentils are tender.

*You may need to add more water as the soup cooks/thickens, and especially when you reheat the soup the next day. Just add enough water to achieve your desired consistency.


Warning: this soup is filling. We ate big bowls alongside some salad and rolls, and the soup alone would have been plenty. I highly recommend topping off your bowl with some hot sauce, too (if you're into that kind of thing).


Wednesday, June 5, 2013

thinkThin Crunch Giveaway

Boy, do I have something fun for you guys today!

I think I'll lead with this: thinkThin has offered to giveaway six boxes of their thinkThin Crunch bars - that's 60 bars total!


Each box contains 10 bars, and the winner will receive two boxes (20 bars) of each of these flavors: 


These thinkThin Crunch bars have 8 grams of protein and 4 grams of fiber, are chocked full of legible ingredients, and only contain 6 to 8 grams of sugar each. These bars are also non-GMO - thinkThin is even partnering with Whole Foods to find and develop readily available sources of non-GMO proteins and connect them with their current suppliers.

thinkThin also sent me six boxes of their Crunch bars to sample, and I have to say, each of these bars is flavorful and satisfying. I typically eat a granola bar with at least 8 grams of protein in it before I go to the gym, and these bars kept me satiated during my entire workout. Each bar is also chocked full of nuts and dried fruit, making them hearty and crunchy without being teeth-shattering. 

So, who wants to win six boxes of these bars?! To enter, simply comment on this post saying which thinkThin Crunch flavor (Blueberry, Cherry, Cranberry Apple) you'd most like to try and why. For an extra entry, you can "like" The Economical Eater on Facebook. Please leave a second comment saying that you did so. (If you're already a fan, your second comment can say just that ;)).

I will pick a winner on Monday (June 10th) morning. Good luck!

*The samples I received were complimentary, but, as always, the opinions expressed in this post are honest and 100 percent my own.


Monday, May 13, 2013

Stir-Fried Rice Noodles with Mushrooms and Spinach

Happy Monday! I hope everyone had a great weekend. We had a busy but fun weekend, with one of the highlights being dinner at Tryst in Arlington on Saturday night. That place is so darn good, and their bartenders make a mean dirty martini. Just sayin'.

This weekend also included a lot of prepping for a dinner party I am catering this Saturday. Although I've already finalized the menu with the host, I've been trying to expand my horizons in the kitchen more than usual over the last few weeks in order to just practice, practice, practice. I'd love to cook for people (other than Z) on a more professional level more often, so the more cooking I can do, the better. 

So, when Z sent me this recipe last week saying it sounded delicious, I knew I had to recreate a vegetarian version at home. And that's just what I did.


Stir-Fried Rice Noodles with Mushrooms and Spinach
Yields: 4 servings
Inspired by MyRecipes.com 
-6 ounces uncooked rice noodles
-1 tablespoon vegetable oil 
-1 teaspoon ground ginger
-1 teaspoon ground coriander
-1 cup chopped green onions
-6 ounces sliced portobello mushrooms, very roughly chopped (I kept mine big for more of a "meaty" texture)
-8 ounces frozen chopped spinach, thawed and wrung dry
-2 garlic cloves, minced
-2 tablespoons rice vinegar
-1 tablespoon lime juice
-3 tablespoons lower-sodium soy sauce
-2 teaspoons Sriracha
-1 tablespoon peanut oil
-Salt, to taste
-2 teaspoons sesame seeds (I used this Toasted Sesame Ginger Seasoning)

Directions:
1.) Cook noodles according to package directions, omitting salt and fat. Drain and rinse under cold water; drain.
2.) Heat a large skillet or wok over high heat. Add vegetable oil to pan; swirl to coat. Add ginger and coriander, and cook until fragrant (about 15 seconds). Add onions and mushrooms; stir-fry for 3 minutes. Add spinach and garlic; stir-fry for another 2-3 minutes.
3.) In a small bowl, combine rice vinegar and the next 3 ingredients (through Sriracha), stirring with a whisk. Add vinegar mixture to mushroom mixture; cook 30 seconds, stirring constantly. Stir in noodles, peanut oil, and salt; cook for 1 minute or until noodles are thoroughly heated, tossing to combine. Sprinkle with sesame seeds.

[Print this recipe]


Spicy Sriracha, fragrant ginger, nutty peanut oil - the flavors in this dish are ridiculously good. I also loved how the meaty mushrooms soaked up every bit of flavor, like a sponge. 

The best part about this dinner was that the leftovers the next day were even better. I recommend eating the leftovers with a fried egg on top...and more Sriracha.


Monday, April 15, 2013

Sambazon Superfood Juices and Smoothies + a Giveaway!

When I hear about a food that is "healthy," "vegan," and "gluten-free," I usually think it's also got to be "bland." But that's definitely not the case with a lot of foods and products - Sambazon Superfood Juices and Smoothies included.


Sambazon's products are made with acai berries, an Amazon superfood. Acai is very high in Vitamin C, and the health benefits of acai include heart health, skin health, and digestive health. The founders of Sambazon are surfers who grew up in California, and started their company based on the belief that caring for our own health and happiness is just as important as caring for that of our community and planet.

Sounds like a lot of hippie talk, huh? But trust me: these drinks are good. I tried both the Acai Berry + Chocolate and Acai Berry + Vanilla protein drinks, and both were delicious (and surprisingly filling). I also tried the Acai Blueberry + Pomegranate, which was packed with antioxidants and Vitamin C. All of the drinks I sampled were full of legible ingredients, and Sambazon's juices are made with 100 percent juice.


Sambazon also now has two new superfood smoothies: Chocolate + Almond + Coconut Milk, as well as Supergreens, which includes kale, ginger, and 120 acai berries with no added sugar. 

Want to try Sambazon's healthy, vegan, and gluten-free concoctions for yourself? You're in luck - one lucky EE reader will win FIVE coupons, each good for one FREE 10.5 ounce Sambazon Superfood Juice or Smoothie (that's FIVE FREE smoothies/juices!). To enter, simply comment on this post saying which Sambazon product you'd like to try. For an extra entry, "like" Sambazon on Facebook (please leave a separate comment saying you did so).

I will pick a winner Thursday (4/18) morning. Good luck!

*In return for doing this giveaway, I also received five coupons for five free Sambazon products. As always, the opinions expressed in this post are honest and 100 percent my own.


Tuesday, March 19, 2013

My Current Obsession: Smoothies

Kale, banana, blueberry, and OJ smoothies.

I've never been a fan of liquifying my meals. I like the act of chewing. I'll start drinking my meals when I'm 85, thank you very much.

Recently, however, I have discovered the beauty of smoothies...for a snack. See, smoothies have never filled me up when I've tried replacing a meal with one of them. I'm always hungry an hour or two later, wishing I had just masticated some solid food. Also, protein powder scares me, and, back in the day, I used to think that was the only satiating ingredient in a smoothie. But over the last few weeks, I have discovered the beauty of utilizing frozen fruits and vegetables to make simple, delicious smoothies that are packed with nutrients.

Strawberry, banana, cocoa powder, and almond milk smoothie.

I always thought making smoothies had to be expensive, but you really only need a few simple, affordable ingredients to make a tasty one. I've only whipped up a couple of smoothies so far, but my favorite combination to date is a handful of frozen strawberries, a tablespoon of unsweetened cocoa powder, a tablespoon of peanut butter, and vanilla almond milk. I also love the texture bananas give to a smoothie - they make them ultra thick and almost creamy. 

I've also used kale, frozen spinach, and frozen blueberries in my smoothies, and all have been successful. I'm still getting used to drinking leafy green vegetables, but I like knowing my body's getting the nutrients it needs in a simple snack. I also just bought frozen peaches today, which I am quite excited to use in my next smoothie!

As a snack, my simple smoothies keep me satiated for longer than I'd expect them to. I still don't think I could ever replace a meal with one and be completely satisfied, but the snack smoothie works for me. 

Are you a smoothie fan? If yes, what's your favorite smoothie recipe?


Tuesday, February 26, 2013

Hippie Joes

Whenever we walk down the organic aisle at the grocery store, Z asks - out loud - why we're in the "hippie aisle." Despite the fact that we actually buy quite a few items from the organic aisle each week (the affordable items, at least),  he still feels the need to poke fun at it. 

As a result of his teasing, I thought "hippie" was the perfect play on words for these lentil "sloppy joes." They're definitely tasty, sloppy, and incredibly filling, but they're also a "crunchy granola" version of the original dish. I came up with this recipe Friday night, after researching a bunch of different recipes online, and it was a big hit with Z and our good friend, Dave (an omnivore). 


Hippie Joes
Yields: 4 servings
-1 cup uncooked lentils
-4 cups water
-1 tablespoon olive oil
-1/2 yellow onion, diced
-6-8 jarred roasted peppers (or 1 bell pepper), chopped
-1 teaspoon minced garlic
-2 tablespoons chili powder
-1/2 teaspoon dried oregano
-Salt and black pepper, to taste
-1/4 cup ketchup
-2 tablespoons maple syrup
-1/2 teaspoon mustard
-4 hamburger buns, lightly toasted
-4 slices pepper jack cheese (optional)
-Bread and butter pickle slices, for garnish (optional)

Directions:
1.) Place lentils and water in a small sauce pan. Cover and bring to a boil. Once boiling, lower heat and simmer for about 20 minutes, or until lentils are soft. Drain and set aside.
2.) Heat the olive oil in a medium-size sauce pan over medium heat. Saute the onion until softened, about 5-7 minutes (if you're using bell pepper, add that in with the onion). Add the roasted peppers and garlic and saute one minute more. Add the cooked lentils, chili powder, oregano, salt, pepper, and ketchup; stir. Lower heat and cook for about 10 minutes.
3.) Add the maple syrup and mustard and heat through. Turn the heat off and let sit for about 5-10 minutes.
4.) Serve lentil mixture on toasted hamburger buns, garnished with pepper jack cheese and pickle slices (optional). 


The sweet maple syrup combined with the tangy hint of mustard, salty ketchup, and spicy chili powder really helped to make these hippie joes a winning dish. I also loved the varying textures from the onions, peppers, and hearty lentils. This is also one of those meals where the leftovers are even better the next day, because the flavors have had even more time to fall in love with one another. 

Despite the fact that, all day Friday, I had this song in my head...


...I'd say this was one winner of a meal in our house.

(Bonus: I used the leftover lentils we had from this soup to make these Hippie Joes).

Where do you do your grocery shopping? We alternate between Shaw's and Trader Joe's.


Tuesday, February 19, 2013

Cold-Fighting Lentil Soup

This past weekend was what I'd call an "ideal weekend." Lots of relaxing, hanging with friends and family, and eating delicious food (with a little productivity mixed in). We went to a concert (and Falafel Corner) Friday night, met up with friends at Stoddard's Saturday night, and watched a ton of TED Talks and "Shameless" on Sunday. Yesterday, we both did a little work before getting a new TV stand for our office, and gorging on Stone Hearth Pizza.

My friend Lisa and I at Stoddard's.

The beer I drank while watching "Shameless" (highly recommend this brew).

Our new TV stand and TV - we used to have a giant armoire in its place.

Despite having such a lovely weekend, Z and I are both getting over colds. Mine's been lingering for a solid 1 1/2 weeks, and Z's showed up a few days ago. On Valentine's Day, Z requested some kind of lentil soup for dinner, so that's what we had - but I made sure to pack the soup with a ton of cold-fighting nutrients, too. 


Cold-Fighting Lentil Soup
Yields: 8 servings
Adapted from Real Simple
-2 tablespoons olive oil
-1 yellow onion, diced
-1 28 ounce can whole tomatoes, drained
-6 cups water or low-sodium vegetable stock (I used 2 cups stock, 4 cups water)
-2 sweet potatoes, peeled and chopped
-1 bunch kale, thick stems removed and roughly chopped
-1/2 cup brown lentils
-Dried thyme
-Pinch of crushed red pepper flakes
-Salt and black pepper
-Grated Parmesan cheese, for garnish (optional)

Directions:
1.) Heat the oil in a large saucepan over medium heat. Add the onions and cook, stirring occasionally, until they begin to soften, 3 to 4 minutes. Add the tomatoes and cook, breaking them up with a spoon, for 5 minutes.
2.) While the tomatoes cook, heat the sweet potatoes, in batches, in the microwave for 3 minutes per batch. (This will help prevent the potatoes from having the texture of rocks; I find the potatoes take much longer to cook than the lentils).
3.) Add 6 cups water/stock to the saucepan and bring to a boil. Stir in the sweet potatoes, kale, lentils, thyme, crushed red pepper, salt, and black pepper. Simmer until the lentils are tender, 25 to 30 minutes.
4.) Spoon into bowls and top with the Parmesan cheese, if using.


This soup is very similar to my Hearty Kale, Sweet Potato and Lentil Soup, but this version's much more packed with vegetables. It also made a bigger batch, and I love the simplicity of flavors in this version. Z and I both definitely felt healthier after a big bowl of this!

Have you come down with a cold yet this winter? I feel like I'm catching a cold every two weeks this year!


Wednesday, February 13, 2013

My Current Obsession: Hummus, as a Condiment

It's no secret that I'm a hummus fan, but I don't just enjoy it as a dip.


In fact, I eat hummus just about everyday...in my sandwich at lunch. I'm sure you've all heard of hummus sandwiches before, but instead of eating nothing but bread and hummus (which does not sound appealing), I slather hummus on my sandwich like a condiment.


Typically, I have a wrap for lunch and fill it with sprouts, arugula, cheese, Tofurky, and a hearty smear of creamy hummus. Z and I almost always buy this brand of hummus, and it never disappoints - especially in a wrap or sandwich. Z, too, almost always puts hummus in his egg sandwiches in the morning, and loves the added protein it provides before he bikes to work. 

Hummus is not only rich in protein, though. The chickpeas in traditional hummus do not contain any cholesterol or saturated fats, and they've been known to be effective in preventing build up of cholesterol in the blood vessels [source]. Hummus in general also contains Omega 3 fatty acids, iron, and vitamin B6, to name a few.

Despite it's health benefits, I just love the delicious, creamy addition hummus gives to my lunches. It's a welcome change from my usual tangy mustard.

Have you ever tried hummus in your sandwich before? If not, will you now?