Monday, December 23, 2013

Rialto & Muir Glen Organic Giveaway Winner

Happy Monday!

Thank you to everyone who entered my Muir Glen Organic Tomatoes and Rialto giveaway last week. We officially have a winner! (The winner was chosen via Random.org).

The winner is...

Julie!

"I love to make goulash [with tomatoes]."

Congrats, Julie!

And for all those who celebrate, may you have a very Merry Christmas! We're headed to New Hampshire tomorrow to celebrate Christmas Eve and day with my immediate family. I can't wait!


Friday, December 20, 2013

Salted Christmas Stout Cookies

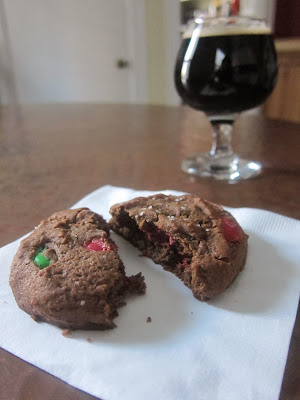
It's not officially Christmas until the holiday M&Ms hit store shelves. The red and green chocolate candies have been a part of my holiday traditions for as long as I can remember. So earlier this week, when I realized I'd done no baking with this nostalgic candy yet this year, I got to work in the kitchen.

And since we had Founders Breakfast Stout on tap at our house, I decided to throw some of that into the mix as well. Because...why not?

Salted Christmas Stout Cookies | The Economical Eater

Salted Christmas Stout Cookies | The Economical Eater

Salted Christmas Stout Cookies
Yields: About 1 dozen
Adapted from CraftBeer.com
-1 1/2 cups all-purpose flour
-1/4 cup + 1 tablespoon unsweetened cocoa powder
-1/2 teaspoon kosher salt
-1/2 teaspoon baking soda
-1 teaspoon baking powder
-1 stick butter, softened
-1/2 cup brown sugar
-1/4 cup granulated sugar
-1/2 teaspoon vanilla extract
-1 large egg
-3/4 cup stout (I used Founder's Breakfast Stout)
-1 cup holiday M&Ms
-Sea salt (I used fleur de sel)

Directions:
1.) Preheat the oven to 350 degrees F and line a baking sheet with parchment paper.
2.) In a medium bowl, whisk together the flour, cocoa powder, salt, baking soda, and baking powder. 
3.) In a larger bowl, beat the butter with the sugars until light and fluffy. Add the vanilla and egg and beat well.
4.) Alternate the flour and the beer with the egg mixture until combined. Fold in M&Ms.
5.) Using an ice cream scoop, scoop the dough onto the prepared sheet (you can also chill the dough for 30 minutes before doing this step). Sprinkle a little bit of sea salt over each cookie. Bake for 15-17 minutes or until the top springs back lightly when touched. Cool completely.


Salted Christmas Stout Cookies | The Economical Eater

The end result was a soft-baked cookie chocked full of those festive M&Ms. The flavor of the stout is slightly apparent, while allowing the cocoa flavor to be the star. And the sea salt? Well, that just adds a lovely salty-and-sweet combination to each and every bite.

What's your favorite holiday candy?

P.S. In case you missed it, I'm giving away a bunch of goodies from Muir Glen Organic Tomatoes and Rialto restaurant. You have through Sunday (12/22) to enter!


Wednesday, December 18, 2013

Rialto and Muir Glen Tomatoes Giveaway

If you like tomatoes, Jody Adams, and Rialto, then this giveaway is for you.

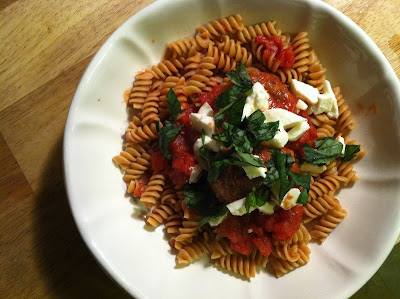
Unfortunately, tomatoes are not fresh, juicy, and delicious year-round - that's where Muir Glen Organic Tomatoes comes in. These canned tomatoes are picked at the peak of ripeness once a year in California and canned within hours. This method locks in freshness and fantastic tomato flavor. Just last night, I used two cans of their Fire Roasted Crushed Tomatoes to make a simple pasta sauce, and the flavor was fantastic. It's clear fresh tomatoes are used in their products, and somehow, Muir Glen tomatoes avoid having that tin can aftertaste. 


Rialto Restaurant & Muir Glen Organic Tomatoes giveaway | The Economical Eater

In an effort to prove that we can still enjoy tomatoes year-round, Muir Glen asked me if I'd like to offer a giveaway to you all. The giveaway involves loads of their tomatoes, as well as several special items from Chef Jody Adams of Rialto (and TRADE), a James Beard Award-winning chef.

So, what's up for grabs? Here's the lengthy list:

-$50 gift card to Rialto
-Signed copy of Adams' book, In the Hands of a Chef: Cooking with Jody Adams of Rialto Restaurant
-Nine cans of Muir Glen Organic Tomatoes (including Diced Tomatoes, Fire Roasted Crushed Tomatoes, and Fire Roasted Diced Tomatoes)
-Bamboo serving tongs
-Canvas tote bag
-Guy Fieri can opener


Rialto Restaurant & Muir Glen Organic Tomatoes giveaway | The Economical Eater

To enter, please leave a comment on this post with your favorite dish to make using tomatoes. For an extra entry, tweet: "I want to #win a gift package from @Rialto02138, @MuirGlenOrganic, and @MichellePC!" Please leave a second comment with your tweet. 

I will pick a winner on Monday, December 23rd. Good luck!

*I received the same gift package in return for hosting this giveaway. All opinions are my own.

This giveaway is now closed. 


Tuesday, December 17, 2013

Very Full Tart

Last week, Z and I went to Z's godfather's house to check out his brand new kitchen. While there, I spent more time swooning over the Jerusalem and Plenty cookbooks (by Yotam Ottolenghi) he had out on the counter. I've been hearing a lot of good things about these cookbooks...and now I can see why. The photos are gorgeous and the recipes are impressive yet approachable. So, when Z's godfather asked if I wanted to borrow one of them, I quickly said yes.

The book I ended up borrowing was Plenty, and I decided to make a variation of the Very Full Tart recipe when my cousins came over for dinner. Knowing everyone at the table loved all things eggs, vegetables, and cheese, I knew this would be a hit. And it was.

Very Full Tart | The Economical Eater

Very Full Tart
Yields: 2 tarts (8-10 servings)
Adapted from Plenty
-2 red bell peppers*
-2 yellow bell peppers*
-Olive oil
-2 small sweet potatoes, peeled and cut into 1-inch dice
-Salt and pepper
-2 large yellow onions, thinly sliced
-2 bay leaves
-8 ounces white button mushrooms, sliced
-2 frozen deep-dish pie crusts 
-Fresh thyme
-2/3 cup whole milk ricotta
-8 ounces feta 
-4 medium eggs
-2 cups heavy cream

Directions:
1.) Preheat the oven to 450 degrees. Use a small serrated knife to cut around the stems of the peppers and lift it out along with the seeds. Shake the peppers to remove any remaining seeds. Place the peppers in an ovenproof dish, drizzle with a little of the olive oil, and put on the top shelf of the oven.
2.) After 12 minutes, place the cut sweet potatoes on a baking sheet in an even layer. Drizzle with olive oil and sprinkle with salt and pepper; toss to coat. Place in the oven on the rack underneath the peppers. After about 12 more minutes, turn the peppers and toss the potatoes to ensure everything cooks evenly.
3.) After an additional 10-12 minutes, the peppers and potatoes should be cooked. Remove from oven and reduce oven temperature to 325 degrees. Cover the peppers with foil and cool, then peel and slice into strips.
4.) Heat 4 tablespoons of olive oil in a large frying pan on medium heat. Saute the onions with the bay leaves and some salt for 25 minutes, stirring occasionally, until they turn brown, soft, and sweet. Remove from the heat, discard bay leaves, and set aside.
5.) In a separate, smaller pan, heat 2 tablespoons of olive oil over medium-low heat. Add mushrooms, and cook until browned, about 5-7 minutes. Remove from heat.
6.) Scatter the cooked onion evenly over the bottom of both crusts and top with roasted vegetables and mushrooms. Scatter thyme leaves over. Next, dot the vegetables with small chunks of both cheeses.
7.) Whisk the eggs and cream in a bowl with some salt and pepper. Carefully pour this mixture into the tart. Place in the oven and bake for 35-45 minutes, or until the filling sets and turns golden. Remove and allow to rest for at least 10 minutes before serving.

*You may not need all of the peppers, as the tart gets too full; I had about 1/4 of a roasted pepper left (and used it in eggs the next morning!).


Very Full Tart | The Economical Eater

This tart is chocked full of flavor - and ingredients, as you can see. The sweet peppers, onions, and potato mixed with the meaty mushrooms and tangy feta - followed by the creamy ricotta and eggs - was an incredible combination of flavors and textures. Z and I aren't usually big leftover people, but we plowed through the leftovers of this.

I highly suggest serving this rich tart with a simple green salad. We served an arugula salad on the side, and it provided a great balance to all of the tart's richness.

Also, the directions for this recipe may seem long, but these tarts were surprisingly easy to whip up within an hour or so. You could also make them ahead of time and just heat them through before serving. 

Which cookbooks are you loving lately?


Tuesday, December 10, 2013

One Year In

Exactly one year ago today, I told you guys that I left my full-time cubicle job to further pursue a career in food writing and professional cooking. So, how did the first year go? Surprisingly swimmingly, with lots of learned lessons along the way.

I've broken down the best parts of working for myself this past year, and the not-so-great parts that have come along with it (although the good definitely outweighs the bad). If you're contemplating freelancing full-time/working for yourself, I hope these things I've learned over the last 12 months will be helpful to you!

The Pros and Cons of Freelancing | TheEconomicalEater.com
Yes, that is booze. Backbar has free wi-fi from 4-6 p.m. (except on Tuesdays)!

The Pros:
-Every day is different. I currently work with eight different companies and publications, plus manage this here blog and my own private catering business. With that being said, it's nearly impossible to have two days that are the same. I love that. It's definitely not for everyone, but I've learned a non-routine work schedule works for me.

-Flexibility. I make my own schedule - I mean, how bad that can be? I thankfully have an immense amount of self-discipline, so I'm up early and typically work through 6 p.m., but I could sleep in if I wanted to (and I have, some days). Doctors' appointments, haircuts, etc. are also worlds easier to schedule and get to now.

-Loving what I do. This one was probably obvious, right? None of this feels like work. I get to eat, cook, write, and do online marketing every single day. I am beyond lucky and grateful!

-Meeting new people. Everyone always asks me: "Do you miss talking to people?" But I seriously have met more people in this last year than I ever did working at a company. I've been to more lunch dates, meetings, interviews (for articles I'm writing), blog events, etc. than I ever had the time (or the motivation) to do before.

The Cons:
-Inconsistent pay. I knew this before going into freelancing full-time, but it definitely takes some getting used to. And my eight jobs could turn into five tomorrow - there's never any guarantee. Making a living as a freelancer is 100% possible, but it isn't easy, and you need to be prepared for really great income months...and really bad ones.

-Never leaving work. Since what I'm currently doing doesn't feel like work, I check my email anywhere and everywhere I go. I take business calls off-hours (meaning, outside of the 9-5 block). I have even done a little work on the weekends (not including cooking gigs). It can be hard to turn off my "work mode," but I am working on it!

-Lessons learned. Actually, I see learning lessons as a pro, but the mistakes I've made this year are sort of under the pro and con categories. I think making mistakes is a great thing (as long as you learn from them), but when you work for yourself, you're the only one to blame. Let's just say when some people discover you freelance full-time, they automatically assume you have all the time in the world to work for them...for very little pay. I've taken a few low-paying writing jobs and gigs since I started freelancing - basically just to help make ends meet - but I thankfully learned early on that no job is worth compromising my credibility for. I left my corporate job to pursue the career I wanted, not to just make a few bucks in my yoga pants at home. My patience eventually paid off.

The bottom line is this: I wake up everyday excited to get to work. That has never happened before. (Well, at least not since I worked at Honey Dew Donuts when I was a teenager. That job rocked!).

I realize my work life may not be as successful in 2014 as it was in 2013. I am hopeful that it will be (if not more so), but you just never know. All I know is that working hard has really, really paid off so far, so I'm just going to keep doing what I've been doing. Oh, and hopefully I will do more cooking for this blog in 2014 - that's my #1 goal. ;)

Did you make any career changes in 2013?


Tuesday, December 3, 2013

Moroccan-Spiced Lentil & Veggie Stew

I hope you all had a great Thanksgiving! Our's was super relaxing, and we followed up a four-day stint on the Cape with a short brewery crawl in Vermont (our first stop was documented here). It was a lot of fun, but I was happy to be home Sunday night.

And what better way to welcome ourselves back home than with a big pot of healthy soup? I was in the mood for something warm and nutritious - but also full of flavor - and that's how this soup was born. Full of warming spices, hearty lentils, and nutritious vegetables, I am beyond thankful that we have so much leftover. This soup will also freeze well, so our leftovers should last us all winter long.


Moroccan-Spiced Lentil & Veggie Stew
Yields: 8-10 servings
-2 tablespoons olive oil
-1/2 large yellow onion, diced
-4 medium carrots, chopped
-1 clove garlic, minced
-Cinnamon (about 1 teaspoon)
-Turmeric (about 1 1/2 teaspoons)
-Cumin (about 1 tablespoon)
-Ground coriander (about 1 1/2 teaspoons)
-Pinch of cayenne pepper
-Salt and pepper
-1 box (32 ounces) low-sodium vegetable broth
-1 1/2 cups water*
-5 white button mushrooms, sliced
-1 3/4 cups lentils
-1 15-ounce can diced tomatoes
-2 cups frozen spinach, thawed
-1 cup frozen peas, thawed

Directions:
1.) Heat oil in a large sauce pot over medium heat; add onions and carrots and cook, stirring occasionally, until softened, about 10 minutes. 
2.) Stir in garlic and cook for 30 seconds. Add spices, and cook, stirring until fragrant, about 1 minute.
3.) Add broth, water, mushrooms, lentils, and tomatoes; bring to a boil. Reduce heat and simmer, partially covered, stirring occasionally for about 35-40 minutes. 
4.) Stir in spinach and peas and cook for an additional 10 minutes, or until spinach and peas are cooked and lentils are tender.

*You may need to add more water as the soup cooks/thickens, and especially when you reheat the soup the next day. Just add enough water to achieve your desired consistency.


Warning: this soup is filling. We ate big bowls alongside some salad and rolls, and the soup alone would have been plenty. I highly recommend topping off your bowl with some hot sauce, too (if you're into that kind of thing).