Thursday, October 31, 2013

Eggplant and Sun-Dried Tomato Pizza

I have an obsession with making the best homemade pizza right now (thankfully, I've already mastered the sauce...and some no-yeast dough). As a result, it's hard for me to buy store-bought sauces or crusts anymore - they all just taste like the packages they're sold in. But when local company Rustic Crust (based out of Pittsfield, N.H.) reached out to me to help them celebrate National Pizza Month with their "My-Oh-Pie" Pizza Recipe Competition, I was intrigued.

The main reason I was interested in working with Rustic Crust was the ingredients they use. For instance, the ingredient list on their Crispy Thin Crust (which was used for this recipe) goes a little something like this: Unbleached/Unbromated Wheat Flour, Water, Natural Culture, Semolina Flour, Whole Wheat Flour, Sea Salt, Honey, Yeast, Organic Soy Oil, Olive Oil.

Obviously, there are more ingredients in here than I'd use for my own dough, but I still love how everything is legible and real. No scary chemicals or words I can't pronounce.

For the My-Oh-Pie contest, I was asked to create a pizza recipe with Rustic Crust's sauce and one of their crusts. The recipe I developed is loaded with fresh flavors, varying textures, and a wonderful hit of fresh garlic in each bite.

Eggplant and Sun-Dried Tomato Pizza | The Economical Eater

Eggplant and Sun-Dried Tomato Pizza
Yields: 1 pizza (about 2-4 servings)
-1 small eggplant, cut into 1/3-inch-thick rounds
-2 tablespoons good olive oil
-1 clove garlic, minced
-Pinch of crushed red pepper flakes
-Shredded mozzarella cheese 
-2 tablespoons of jarred sun-dried tomatoes
-1/4 teaspoon dried basil

Directions:
1.) Turn your broiler on. Arrange eggplant rounds on a foil-lined baking sheet. 
2.) In a small bowl, mix oil, garlic, and crushed red pepper together; brush oil mixture on both sides of eggplant. Broil for 3-4 minutes on each side, until golden brown and tender.
3.) When eggplant is done, turn oven down to 425. Spread sauce on crust and top with cheese. Then, layer on the eggplant slices, overlapping slightly. Dot sun-dried tomatoes all over pizza; sprinkle over dried basil. 
4.) Cook pizza in oven for 8 to 12 minutes, or until cheese is bubbling and crust is golden brown.


Eggplant and Sun-Dried Tomato Pizza | The Economical Eater

I definitely had two slices of this for lunch...and two after the Red Sox game last night (that was after going out to dinner). This pizza is that good, and I was really impressed with how crispy and tasty the crust was - no cardboard flavor at all. The sauce was also nicely sweet with a great tomato flavor.

If I become one of five finalists in the My-Oh-Pie contest, I'll let you guys know!

What are your favorite pizza toppings?

P.S. Yay Red Sox!

Rustic Crust sent me their products in order for me to create a recipe. As always, all opinions are my own.


Wednesday, October 30, 2013

Peanut Butter Chip & Chocolate Chunk Cookies with Espresso Sea Salt

Longest recipe title ever? Probably, but these cookies have a lot going on...in a really, really good way.

The best chocolate chip cookie recipe I've ever baked is this one from Betty Crocker. It's seriously foolproof, and how can cookies with two sticks of butter baked into them be bad? I used this recipe as my base for this new, Halloween-ish creation (I say "Halloween-ish" because of the colors). Chocked full of sweet peanut butter chips and rich chocolate chunks, these buttery gems are topped off with some salty bits of espresso sea salt. Dig in.

Peanut Butter Chip & Chocolate Chunk Cookies with Espresso Sea Salt | The Economical Eater


Peanut Butter Chip & Chocolate Chunk Cookies with Espresso Sea Salt
Yields: 36 servings
Adapted slightly from Betty Crocker 
-3/4 cup granulated sugar
-3/4 cup packed brown sugar
-1 cup butter, softened
-1 teaspoon vanilla
-1 egg
-2 cups all-purpose flour (or whole wheat flour)
-1 teaspoon baking soda
-1/2 teaspoon kosher salt
-1/2 cup semisweet chocolate chunks
-1/2 cup peanut butter baking chips
-Espresso sea salt (or regular sea salt)

Directions:
1.) Heat oven to 375 degrees.
2.) Mix sugars, butter, vanilla, and egg in large bowl. Stir in flour, baking soda, and salt (dough will be stiff). Stir in chocolate chunks and peanut butter chips. Drop dough by the ice cream scoop-full (about 2 inches apart) onto ungreased cookie sheet.
3.) Bake 8 to 10 minutes or until light brown (centers will be soft). Cool slightly; remove from cookie sheet. Cool on wire rack.

[Print this recipe]


Peanut Butter Chip & Chocolate Chunk Cookies with Espresso Sea Salt | The Economical Eater

Buttery, sweet, salty - all of my favorite flavors wrapped in one (er...36) cookies. Betty's chocolate chip cookie recipe is a seriously awesome foundation for some seriously awesome cookie variations.

Happy [early] Halloween!

Are you dressing up at all this year? I dressed up as an 80's chick last weekend, but that was about it. I'm getting old.


Tuesday, October 29, 2013

Beat Hotel in Harvard Square

Last week, I was invited to attend a blogger dinner at Beat Hotel, which recently opened in Harvard Square. The same folks from The Beehive are behind Beat Hotel, a hippie-inspired music venue and restaurant in the former Tannery space.

My evening started with an American Breed ($11), made with Maker's Mark, St. Elder elderflower liqueur, and apple cider. It was a fantastic fall cocktail - refreshing, yet comforting.

Beat Hotel | The Economical Eater

After sipping on our cocktails, we were all seated for dinner. I sat with Richard, Kerrie, and Jil. Beat Hotel invited us to try anything on their regular menu, so we really got a feel for their food and what they offer.

Our dinner kicked off with some standard bread and butter (the bread is from Hi-Rise Bread Company).

Beat Hotel | The Economical Eater

For an appetizer, I went with the Crispy Veggies ($11), which were cut and fried to resemble calamari. Well-seasoned and served with two flavorful sauces, this was a much more impressive starter than it looks like.

Beat Hotel | The Economical Eater

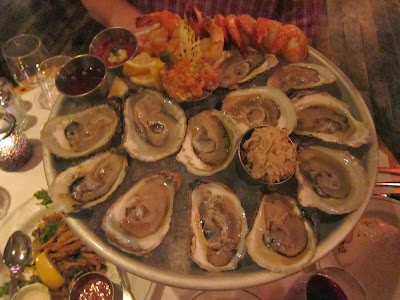
For the table, we ordered the Raw Bar Platter for four ($80; the option for two people is $40). Now, normally I would never recommend spending $80 for an appetizer, but the Maine oysters on this platter were the freshest oysters I've ever eaten. The plump Gulf shrimp were also fantastic, and the accompanying smoked tuna and fresh salmon tartars were also delicious when smeared on crispy baguette slices.

Beat Hotel | The Economical Eater

For my entree, I went with our waiter's recommendation and ordered the Tandoori Spiced Halibut ($34), which was served with red lentils and cucumber raita.

Beat Hotel | The Economical Eater

Although it's the most expensive entree on the menu, this plate was beautifully presented and full of flavor. The Indian flavors and spices were spot-on, and the halibut was cooked perfectly - my fork easily cut into its moist, flaky texture. 

For dessert, my table decided to try one of each (I like them). On the dessert menu that day (all desserts are $8): Maple Bread Pudding with Brûlée Banana and vanilla ice cream; Chocolate Peanut Butter Cake with raspberry coulis and salted caramel ice cream; and Apple Strudel Cheesecake with Chantilly whipped cream.

Beat Hotel | The Economical Eater
Maple Bread Pudding.

Beat Hotel | The Economical Eater
Apple Strudel Cheesecake.

Beat Hotel | The Economical Eater
Chocolate Peanut Butter Cake.

All of the desserts were great, but our favorite as a table was the bread pudding. Moist, gooey, and ideally sweet, it was a fantastic way to end our meal.

A few more things about Beat Hotel that are noteworthy: 
  • Their menu highlights seasonal ingredients and global flavors
  • They have live music every night, and the acoustics are ideal - you can have a conversation without yelling
  • They have wine on tap, and you can order a half glass, full glass, or carafe
  • They have plenty of vegetarian (and even vegan) options

Although the prices are a little more than I'd normally pay, I'd definitely return to Beat Hotel for a date night - or a cocktail and some appetizers, to keep it economical. The vibe there is lovely, the food really blew us away, and the cocktails are inventive and impressive.

Have you been to Beat Hotel yet? If yes, what's your review?

This meal was complimentary, but all opinions are my own.


Beat Hotel on Urbanspoon


Wednesday, October 23, 2013

Spiced Applesauce Bread

Last month, my friends at Zulka challenged me to create a non-GMO recipe featuring their sugar in the month of October - which also happens to be Non-GMO Month (and National Apple Month...who knew?!). I won't go into GMOs and why they suck, but I will tell you that Z and I have been trying to make a more conscious effort over the last 6 to 12 months to not consume GMOs. Of course, this can be impossible at restaurants and even with groceries, since food with GMOs are not labeled as such - but, we're trying. (In all honesty, I'm not even sure this recipe is 100 percent GMO-free...but I'm hopeful that it is).

The recipe I created came from a failed apple jam recipe. I was testing apple jams for a recent cooking event I did at Night Shift Brewery, and this was the first. It failed at becoming a jam, but it made a damn good applesauce. Chock full of apples from the Harvard Square farmers' market, the sauce also turned into one damn good bread.

Spiced Applesauce Bread | The Economical Eater

Spiced Applesauce Bread
Yields: 1 loaf
Adapted from AllRecipes.com

Applesauce:
-4 Cortland apples, peeled, cored, and cut into 1/2-inch dice
-2 cups water
-1/2 cup Zulka sugar
-1/4 teaspoon garam masala
-2 teaspoons lemon juice

Directions:
1.) Place apples and water in a large saucepan. Cover the pan with a lid and simmer until apples become tender, about 10 to 15 minutes.
2.) Add sugar and garam masala, then stir. Continue cooking for another 5 minutes.
3.) Add lemon juice. Continue stirring until the mixture begins to thicken.
4.) Allow applesauce to cool before placing in an airtight container. Let sit in the refrigerator overnight before serving/using.

Bread:
-1 1/4 cups applesauce
-3/4 cup Zulka sugar
-1/2 cup vegetable oil
-2 eggs
-3 tablespoons unsweetened vanilla almond milk
-2 cups all-purpose flour
-1 teaspoon baking soda
-1/2 teaspoon baking powder
-1/4 teaspoon garam masala
-1/4 teaspoon ground nutmeg
-1/4 teaspoon salt

Directions:
1.) Preheat oven to 350 degrees. Lightly grease a 9x5-inch loaf pan.
2.) In a large bowl, combine the applesauce, sugar, oil, eggs, and milk; beat well. Sift in the flour, baking soda, baking powder, garam masala, nutmeg, and salt; stir until smooth.
3.) Pour batter into prepared loaf pan. Bake in preheated oven for 60 minutes, or until a toothpick inserted into center of the loaf comes out clean.


Spiced Applesauce Bread | The Economical Eater

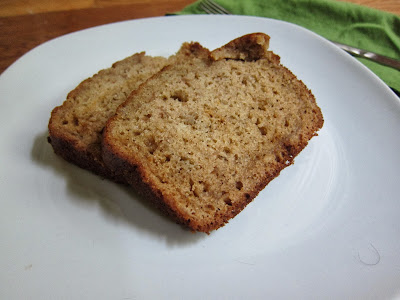
This bread was incredibly moist and full of apple, clove, cinnamon, and nutmeg flavors. See how there are only two slices in each of these photos? That's because we devoured the rest before I could even snap a picture.

Spiced Applesauce Bread | The Economical Eater

I <3 fall.

Do you try to purchase foods that are GMO-free? 

Disclosure: Zulka sent me a bag of their sugar in order to create this recipe. All opinions are my own.


Thursday, October 17, 2013

New England Dessert Showcase

Last weekend, I ate dessert for breakfast...and I liked it.

I woke up on Saturday, jumped on the T, and met Melissa at the Westin Waterfront Hotel so we could eat our way through the New England Dessert Showcase

New England Dessert Showcase 2013 | The Economical Eater

Every September, the New England Dessert Showcase brings together incredibly talented dessert designers and their creations for us East Coasters to enjoy. And boy, did we enjoy just about everything we consumed that morning. From iced coffee to gelato to whoopie pies, there were plenty of sweet treats to sample.

New England Dessert Showcase 2013 | The Economical Eater

New England Dessert Showcase 2013 | The Economical Eater

New England Dessert Showcase 2013 | The Economical Eater

New England Dessert Showcase 2013 | The Economical Eater

Because we sampled so many different desserts, it would be next to impossible to properly recap all of them for you. So instead, I am going to share my top four favorite samples that I tried (and that I think you guys will like too). 

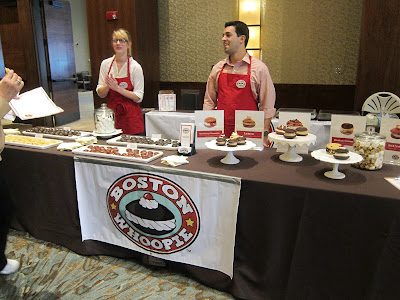
First up: Boston Whoopie.

New England Dessert Showcase 2013 | The Economical Eater

New England Dessert Showcase 2013 | The Economical Eater

I tried a red velvet whoopie pie (not pictured). The cookies were pillowy soft and the cream cheese center was sweet, but there was just enough of it sandwiched between the two cookies. As of now, Boston Whoopie doesn't have a storefront, but they can deliver their whoopie pies throughout the Greater Boston area. Just simply place your order by phone (617-718-1782) to get your goodies.

With a tagline like "Legalized Frostitution," how could I not have fallen in love with VCVC Cupcakes?

New England Dessert Showcase 2013 | The Economical Eater

The women working this table were enthusiastic, funny, and clearly passionate about their product. And after one bite of their mini cupcake (I believe it was a chocolate cake with a salted caramel icing), I was hooked. I'm usually not a fan of sweet icings, but this one had just enough of a buttery flavor and texture (not to mention incredible flavor) to win me over.

I'm sure no one's surprised that another one of my favorites was from a winery. Plymouth Bay Winery, to be specific. The folks from Plymouth Bay were giving out samples of their jams, which are made with their wine.

New England Dessert Showcase 2013 | The Economical Eater

I tried a variety of flavors, but my favorite was the Raspberry Spice, made with fresh raspberries and habaneros - and red wine! It had just the right amounts of heat and sweet, with a subtle yet apparent taste of the wine. It was unique and delicious.

And, last but not least, this Hot Chocolate Lava Cake from Chart House was my favorite dessert of the day. A rich, molten chocolate cake made with Godiva liqueur, served warm with chocolate sauce, Heath bar crunch, and vanilla ice cream. 

New England Dessert Showcase 2013 | The Economical Eater

Do I even need to tell you why this was good? I didn't think so.

The event itself seemed really well organized, and I loved how they had accessible trash cans and water stands throughout the room. The space at the Westin Waterfront was also ideal - big enough for people to spread out, avoiding too many long, cramped lines.

All in all, this was a really fun event, and it was fantastic to meet all of the people behind these delicious desserts. I also discovered some new-to-me businesses that I will be sure to keep an eye out for moving forward. Thanks again, Melissa, for inviting me!

What's your all-time favorite dessert?

I attended this event as part of the media, and thus my ticket was complimentary. As always, all opinions are my own. 


Tuesday, October 15, 2013

Chickpea Fritters

Hello! I hope everyone had a great [long?] weekend. Mine was pretty jam-packed, but awesome. (Let's just say it included lots of desserts (more on that later), a Duck Tour with my nephew, and Cornhole with Z). 

I didn't make this recipe over the weekend, but I did make it a few weeks ago when Z's parents gave us a tub of yogurt-dill sauce they had leftover from a party. I wanted to use it up in something more special for dinner, and since we had a can of chickpeas in the cabinet (per usual), these Chickpea Fritters came to be. 

Chickpea Fritters | The Economical Eater

Chickpea Fritters
Yields: 2 servings
-2 cups canned chickpeas, drained and rinsed
-1/4 cup diced red onion
-1 clove garlic, roughly chopped
-Cumin*
-Coriander*
-Paprika*
-Salt and pepper
-Canola oil
-2 pita pockets
-Yogurt-dill sauce, for garnish

*I eyeball my spices, but I probably used about 1/2 teaspoon cumin and 1/4 teaspoon each of the coriander and paprika. Just taste as you go and see if the mixture needs more of something.

Directions:
1.) Place all ingredients except for canola oil in a food processor. Pulse until well mixed and mostly smooth.
2.) Form chickpea mixture into small patties (it should make about 6-7 patties).
3.) Pour canola oil into a large frying pan, about an inch high from the bottom of the pan. Heat over medium to high heat. Once hot, place chickpeas in the oil and cook until golden brown, about 3-5 minutes. Flip and cook on the opposite side for an additional 3 minutes, or until golden brown.
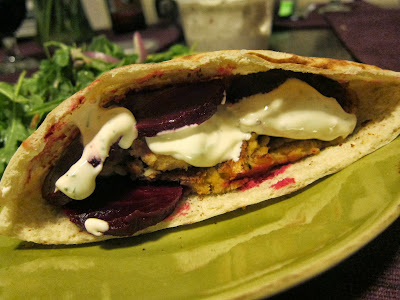
4.) Place 3-4 chickpea fritters in each pita pocket. Add your favorite falafel toppings (we added sliced beets). Drizzle each pita with the yogurt-dill sauce. Enjoy!


Chickpea Fritters | The Economical Eater

I highly recommend doubling this recipe so you have leftovers the next day. I loved the flavorful chickpea fritters - full of "warm" spices - mixed with the cold, sweet beets and creamy yogurt-dill sauce. It was a fabulous combination!

What would you make with leftover yogurt-dill sauce?


Friday, October 11, 2013

Jalapeno Dirty Martini

It's probably pretty clear by now that I like drinking...and that my favorite cocktails are spicy cocktails (as seen here, here, and here). Well folks, this new recipe I whipped up last weekend is no different. 

I love a good dirty martini, but I love dirty martinis even more when they have a little something extra in them - whether it be cheese-stuffed olives or jalapeno-stuffed olives. And since we always have a jar of pickled jalapenos in our fridge, I decided to experiment. 

Jalapeno Dirty Martini | TheEconomicalEater.com

Jalapeno Dirty Martini
Yields: 1 cocktail
-3 ice cubes
-3 ounces jalapeno flavored vodka (I used Stoli)
-1 ounce extra dry vermouth
-3/4 ounce olive juice (from olive jar)
-3/4 ounce jalapeno juice (from pickled jalapeno jar)
-3 olives and 2 pickled jalapenos for garnish

Directions:
1.) Place ice cubes in a martini shaker. Add everything but the olives and jalapenos, and shake for 10-15 seconds. Pour in a cold martini glass.
2.) Place olives and jalapenos on a toothpick; drop into martini. Cheers!

Spicy, smooth, and strong, this was a great way to kick off my weekend.

Are you a fan of spicy cocktails?


Thursday, October 10, 2013

Vegan Cooking Class at Herbal Academy of New England

A few weeks ago, I attended a class at the Herbal Academy of New England's new facility in Bedford, Mass. The class, which was the first in a series, was called "Veganizing Your Life: The Basics of Vegan Cooking." A lot of my catering clients are interested in vegan food - if they're not already vegan - and so I thought this class would give me some vegan cooking inspiration.

Vegan Cooking Class | The Economical Eater

The class was taught by Lisa Kelly, a personal chef and blogger at The Vegan Pact. The class started with an informal discussion about veganism, where Lisa explained the benefits of a vegan diet and then learned from the group why we were there and how much we knew about veganism. It was a great way to get to know our teacher for the evening, but also our fellow classmates (there were about 8 people attending the class).


After about 30 minutes or so of the informative session, we went into the room next door to get cooking.


Lisa shared several vegan-friendly recipes with us. She did the cooking (and explaining of each dish), while everyone in the class helped prep ingredients.


On the menu: Maple Pecan Brussels Sprouts & Butternut Squash with Millet; Massaged Kale Avocado Salad; Cranberry Walnut Quinoa Salad; and Raw Strawberry Cheesecake. Apparently, I didn't take a single photo of the final products, but they were all really delicious, and surprisingly satiating. I don't think I could ever go vegan, but I could easily eat all of these dishes on a regular basis. Especially that cheesecake - borderline mind-blowing. Thankfully,  we all went home with each recipe, and I definitely plan on making the millet dish again soon - it's perfect for this time of year!

Overall, this was a really fun and interactive class, and I loved the combination of information mixed with cooking. I also appreciated how Lisa didn't preach a vegan diet too much - she understood everyone was there for different reasons, and not everyone in attendance wanted to go vegan. We were all just there to learn.

Interested in attending a class at the Herbal Academy of New England yourself? The kind folks over there are offering EE readers 20% off any fall class! Just use code WELCOME20 at checkout to get the discount. Some upcoming classes include: Plant-Powered Protein, Vegan on the Cheap, Juicing Benefits, and a Yule Log Workshop.

Would you ever go vegan, even if it was just temporarily? Why or why not?

This class was complimentary, but as always, all opinions are my own. 


Tuesday, October 8, 2013

Spiced Ginger Shortbread

For me, fall baking must include two essential ingredients: butter and garam masala. Butter is an obvious one, but garam masala is such a "warm" spice - it combines comforting spices like coriander, cardamom, cumin, cinnamon, and cloves, to name a few. It just works in baked goods (especially my Pumpkin Chocolate Chip Bars) this time of year.

Last week, on a particularly perfect fall day, I was in the mood to bake. For some reason, shortbread was calling my name, but I knew I wanted to put a fall twist on the classic recipe. And that's how these cookies were born.

Spiced Ginger Shortbread | The Economical Eater

Spiced Ginger Shortbread
Yields: 36 cookies
Adapted from Martha Stewart
-2 sticks plus 6 tablespoons unsalted butter, room temperature (plus more for pan)
-2/3 cup granulated sugar
-3/4 teaspoon salt
-2 teaspoons garam masala
-1 teaspoon ground ginger
-3/4 teaspoon vanilla extract
-3 1/3 cups all-purpose flour

Directions:
1.) Preheat oven to 275 degrees. Butter a 9 x 13 baking dish, and line bottom with parchment paper. In the bowl of an electric mixer fitted with a paddle attachment, cream butter and sugar on medium speed until light and fluffy (about 2 minutes). Add salt, garam masala, ginger, and vanilla, and beat to combine.
2.) Add flour, 1 cup at a time, beating on low speed until just combined.
3.) Press dough into prepared pan, leveling and smoothing the top. Using a dough scraper or knife, cut dough lengthwise into nine strips, each slightly less than 1-inch wide. Cut the strips crosswise into 36 3-inch bars. Sprinkle with granulated sugar.
4.) Bake shortbread until lightly golden, but not browned, 70 to 85 minutes. Transfer pan to a wire rack to cool. Remove parchment, turn shortbread over, and break or cut with a serrated knife into bars. Store in an airtight container for up to 1 month.

[Print this recipe]

Buttery and full of my favorite fall flavors - ginger, cinnamon, cloves, even cumin - these are some dangerous cookies. Paired with a mug of hot coffee, they're addictive. They will definitely not last the entire month in our house!

What are your favorite fall flavors?


Friday, October 4, 2013

Tofutti Dairy-Free Desserts

When I was little - and it was confirmed that I was lactose-intolerant (like most of us are) - my mom made me try tofu "ice cream." I don't recall which brand she bought, but as a kid, it was awful. I swore to never eat tofu ice cream again.

Years later, I met Z, and he always had Tofutti Cuties (ice cream sandwiches) in his freezer. One day, I tried one - and it was actually really good. Fast forward a few years, and I get an email from Tofutti asking me if I'd like to sample some of their dairy-free desserts to help celebrate their 30th anniversary. I said yes, and was pretty impressed with what I tried. Oh, how times have changed.

Tofutti's products are all 100% dairy-free, and the ones I sampled taste nothing like tofu (I promise). First up was the Vanilla Almond Bark "ice cream," which was super creamy and smooth, and I loved the generous amount of crunchy bark throughout.


The second product I tried were the Yours Truly Ice Cream Cones in vanilla.


These are dangerous. The crunchy sugar cone mixed with the rich chocolate and super creamy vanilla "ice cream" was such a delightful combination - even on a colder fall day.

We also received a box of the Chocolate Covered Flowers bars, but I haven't tried one of those yet. Z has, however, and is a big fan.

My only gripe with Tofutti products: the ingredients. They can be a bit scary/illegible. There are plenty of local companies that make dairy-free desserts with real ingredients. However, I still think Tofutti's products are a good option for those who have limited access to dairy-free desserts. It's amazing how creamy the "ice cream" is!

Have you ever tried tofu ice cream before? If not, would you?

These products were complimentary, but all opinions are my own.


Thursday, October 3, 2013

10 Recipes for Fall

Fall is my favorite time of year. I love the cooler (yet still warm) weather, the leaves changing color, the excuse to not have to leave the house after 4 p.m. because it's too dark and cold...I just love it all. I also, like many of you, love overdosing on everything pumpkin-flavored this time of year, as well as breaking out my crock-pot as soon as September arrives.

With that being said, I wanted to re-share with you guys some of my favorite pumpkin, crock-pot, and just downright comfort food recipes that I love making (and eating) this time of year. Enjoy!


Pumpkin Recipes:
Pumpkin, Black Bean, and Tofu Fajitas
Pumpkin Mac and Cheese
Black Bean and Pumpkin Chili
Pumpkin Chocolate Chip Bars

Crock-Pot and Comfort Food Recipes:
Arugula Pesto Lasagna
Hearty Kale, Sweet Potato, and Lentil Soup
Slow Cooker Vegetarian Chili
Indian-Style Chickpeas and Potatoes
Cheesy Mashed Cauliflower
Breakfast Bread Pudding

What's your favorite recipe(s) to make in the fall?


Wednesday, October 2, 2013

Yak & Yeti in Somerville

Many people have told me to go to Yak & Yeti for great Indian and Nepali food, but I never had the opportunity to go until a few weeks ago.

Z and I went with his brother and his girlfriend before she jetted off to Turkey (oh, how I wish I studied abroad in college), and this ended up being a great send-off meal.

We started with the Vegetable Platter ($7.99), which consisted of samosa, vegetable pakora, paneer pakora, and aloo tikki.


Everything on this platter was delightfully well-seasoned and ideally fried while lacking any excess grease. We all were slightly addicted to the mint sauce that was served alongside everything, too. 

For my meal, I went with the Aloo Mutter ($10.99), made with green peas and potatoes that were cooked with ginger, garlic, onion, and mild spices. (It was also served with basmati rice).


I got my Aloo Mutter spicy, and it had just the right kick of heat without being too overpowering. This dish was also incredibly well-seasoned, and I had a hard time not eating the entire serving in one sitting (Indian leftovers are the best!).

We also all shared a slew of Indian breads that Z ordered for the table (he studied abroad in India while in college - he knows his stuff), and all were fantastic. 

We really enjoyed our first meal at Yak & Yeti, and I definitely plan to return. [Side note: I used a Restaurant.com gift card for this meal - great way to save a few bucks here!].

Did you study abroad in college? If yes, where did you go?


Yak & Yeti on Urbanspoon